Showing posts with label Itty Bitty Banners. Show all posts

Tuesday, May 24

YOU BRIGHTEN MY LIFE

HEY BLOGGIES,

Do you ever make a second or third card of the same design because you loved that design so much?

Well, that is what I have for you today,  Months and months ago, I made this simple but cute card and I recently saw a photo of it and knew I had to make it AGAIN for someone special.,


First, I love the bright crushed curry with the quiet and unassuming gray.  Then I absolutely LOVE the little banner punches YAH, YAH, YAH.  I got the Beatles' song in my head as I made it, "She Loves YOU, YAH, YAH, YAH",.  Ha ha, now YOU have that song going around in YOUR head!!

I used the Kinda Eclectic sunburst behind the light bulb so it looked like the bulb was shining.  I used a ton of Crystal Effects on the bulb itself to make it all shiny (sorry the photo doesn't show it very well.)

The bitty banner under the bulb says YOU BRIGHTEN MY LIFE.  I just can't stand it when my phone won't take a clear focused shot.  I didn't notice that you can't read that saying until I posted it tonight.  And the problem is I ALREADY MAILED IT!!  soooooo sorry.

I would love to hear about the time you made several of the same card because you loved the design.  Especially if it did it weeks or months after the construction of the first one!!

Thanks for visiting.  Happy Tuesday evening to y'all.

Friday, April 19

ANOTHER CARD MADE FROM THE BOUTIQUE BOXES PRINTED KIT

Yesterday and today I am showing you the cards I made from the Boutique Boxes Designer Printed Kit (pg 25 from the Spring Catalog,  $7.95 plus S&H) This kit was so fun to work with and to see all the things included in this kit.  It is originally put together to make 8 gift card holders with 8 mini note cards included.  But all the wonderful dies, baker's twine, buttons, dimensionals, etc. included  makes it a perfect kit for making additional cards as well.

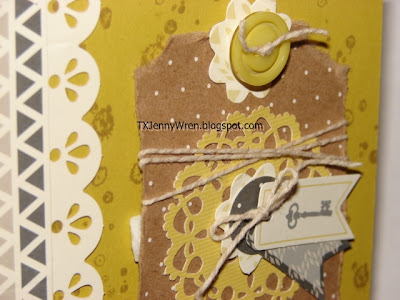
 I used summer starfruit card stock as the card base.  The border on the left is two different die cuts included in the set.  The kraft with polka dots paper is actually part of the gift card holder that I cut and then distressed the edges for my dsp layer.  (If you don't have the distressing tool, you NEED to get it.  Makes easy work of distressing the edges of CS, dsp, etc.)

I used my French Foilage stamp set for the water marks on the card base.  I used crumb cake for the ink.  Then I put three pieces of baker's twine behind the layer before adhering with the dimensionals.  You can see the dimensional on the left because I am taking the photo from the left.  But it does not show looking straight at the card.

 Here is a close up of the main focal point of the card.  The doily die cut is next on the dsp layer, followed by a scallop die cut and then a circle die cut.  I tied two tags together with bakers twine and stamped with gray a small key from the retired set called Elementary Elegance.  You could stamp a small "TO YOU" or "HELLO", etc. here.


I thought the key was really a sweet hint that someone has the key to my heart!~

One final look at the card.  You know, I am going to remove that one dimensional - it is bugging me that you can see it from the left side.  grrr.  But it is easy to remove and now I feel better!!  :-)

Hope you enjoyed this card made from the Boutique Boxes Designer Printed Kit (pg 25 from the Spring Catalog, $7.95 plus S&H)   If you decide to order this kit, won't you consider ordering it from me?  Just click my signature line below to go to my shopping page.

Thanks for stopping by and stay creative my friends!!
I am entering this into the following challenges:

Friday Mashup - make a card and delivery it
Retro Sketches
Techno Stamper: Monday Lunchtime Sketch