Tuesday, July 23

I AM BACK AND A FUN PROJECT FOR HALLOWEEN

HELLO BLOGGIES:  We are back from our Caribbean Cruise!!  We had a wonderful time and really enjoyed ourselves.  The "fun day at sea" (a full travel day each way) was perfect for us to relax, talk, read, people watch, explore the boat, etc.  I thought it would be boring but it absolutely was NOT.  It was perfect!!

The employees aboard the cruise were so friendly and so fun to be around.  Many of them remembered our names and said hello whenever we saw them.  That made it feel like we were with friends!!

We swam with the dolphins in Cozumel and that was the most amazing part of our trip.  They are so gentle and yet so powerful.  When they pulled us around, it was at top speed and so exciting!!

Yesterday, after doing ALL THE LAUNDRY that accumulated from cruising, I started working on my upcoming classes.  Here is a Halloween Banner I created that was so FUN to make:

 Each pennant of the banner started with a 5 x 7 piece of designer paper and then I "WENT WILD".  It was so fun to just pick and choose what I would do with each letter!!

 This is a little closer so you can see more of the detail.  On the "S", I made a bunting (like a medallion but only 1/2 of it).  I also used the NEW HALLOWEEN WASHI TAPE that is in the HOLIDAY CATALOG which starts AUGUST 1ST.


I made banners on my banners!  Used DSP and Washi Tape all over!!  My letters are from my BIG SHOT AND DIES.  LOVE IT.

Want to take the class?  Shoot me an email to reserve your spot.  It will be in August.

Want to purchase the kit?  I am offering the complete kit for you to create your own banner in the comfort of your home for only $20 plus shipping.

Thanks for stopping by to visit.  IF you need any SU supplies, won't you consider purchasing them from me?  Just click on my signature below to go to my Stampin' Up! store.

Stay creative!!

I entered my project at:

SIMPLY CREATE TOO


Monday, July 22

MY PAPER PUMPKIN KIT AT A SPECIAL PRICE FOR TWO MONTHS

WOW!!  My Paper Pumpkin Kits have been discounted to NEW SUBSCRIBERS for TWO MONTHS ONLY special price of only $10/month.  Isn't that amazing??!!  This special is to entice new subscribers to try My Paper Pumpkin Kits and to see what wonderful creations can be made with your monthly kit.

Q:  HOW CAN I GET THIS SPECIAL PRICE?

Answer:  You just visit mypaperpumpkin.com, click on "Join Now" and enter all of your information (especially make sure you choose ME as your demonstrator:  JENNIFER KAY, WOODLANDS, TEXAS. 

Make sure you select "1" as the quantity for monthly kits and enter the coupon code:

 PUMPKINDEAL 

in the promo code box which is located just below the kit quantity. You will then finish with payment information and click "Submit." You will receive a confirmation and a request to set up a password. You can return and do that at any time.

(If after two months you decide NOT to continue your subscription, you go back in to mypaperpumpkin.com and change your quantity to "0".)


At this wonderful special price, I AM GOING TO SUBSCRIBE MYSELF SO I CAN HAVE THESE KITS.

The first kit includes a "C" acrylic block for your stamps.  ONLY this first intro kit includes the block.  After that, it will include stamps, Stampin' Ink Spots, paper, stickers, accessories, etc. but NO acrylic block.

If you have any further questions that are not answered at the paperpumpkin webnsite, please contact me and I will be happy to help you.

Thank you for considering me as your SU demonstrator,.  I sincerely appreciate your support.

Thanks for visiting my blog!!

Friday, July 12

PERFECT TIME TO JOIN MY STAMPIN' UP! TEAM

STAMPIN' UP! has just announced a special for ONE MONTH ONLY for anyone who joins my SU team of demonstrators.  For ONLY $99, you receive $125 of product OF YOUR CHOICE as well as an AMAZING KIT AS FOLLOWS:


New recruits get to pick one of four project kits for free in addition to their starter kit when they join Stampin' Up!  You ALSO get free shipping on your complete kit!!

Dates: July 15-August 31, 2013

Kit Options:
The first three project kits are from the holiday catalog and the last option is from the annual catalog.


Option
Kit Description
Item
Total Value
1
Build a Banner Simply Created Kit AND 
Halloween Banner Simply Created Accessory Kit
133507
132698
$29.90
2
Build a Banner Simply Created Kit AND 
Christmas Banner Simply Created Accessory Kit
133507
132697
$29.90
3
Thankful Tablescape Simply Created Kit
133463
$19.95
4
Tag a Bag Bundle AND
Tag a Box Bundle
131371
131372
$22.45
You may sign up by clicking my signature line below and then go to JOIN NOW, or you may email me and I will answer any questions you have before you sign up.

As always, there is NEVER obligation to purchase at any time, BUT your first order after your starter kit is work a 30% discount if you order $150 or more.  AND every other order you decide to submit STARTS at a discount of 20%.

I would LOVE to have you join my Team of fun gals who get together and "play" with stamps and paper!!

Thanks for stopping by!!

Thursday, July 11

World Treasures Peacock

I loved this stamp set so much I purchased it, but then others were easier to work with so this cute peacock sat on my shelf for several months.  I just discovered it and knew it needed some LOVE.

I stamped the peacock 3 times - pacific point, daffodil yellow and elegant eggplant.  I cut the layers apart.

 Then I used a paper doily and glued the layers back on, but spread out so that the peacock is much bigger than the simple stamped one.  I sponged gumball green along the edges of the paper doily.  And I hope you can see this in my photo - I pierced scallops along the edge of the peacock on the daffodil card base.


 I think you can see better the paper piercing on the right side of the spread out feathers of my peacock.


Two strips of feather themed DSP and a simple message and I was done.  What do you think?  I love how large the peacock turned out.  That is just what I was hoping for.

Thanks for stopping by.  Come on back again to see more fun creations.  And if you need supplies of any kind, just click below to go to my SU shop.

Entered at:

Color Throwdown Birthday Challenge

Friday Mashup

Wednesday, July 10

I DIG YOU

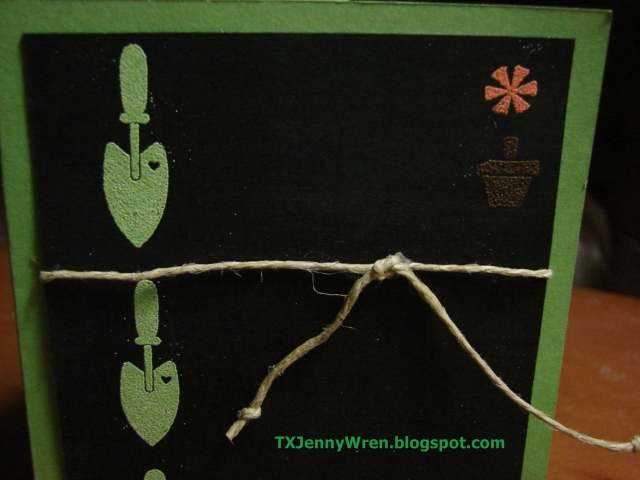
This is the cutest little garden shoves and sentiment.  I just had to get this stamp set.  It is called TAG IT.


Wild Wasabi and basic black are the two colors of this card.  I used embossing powder on the shovels and on the small flower pot in the upper right hand corner.

Here is a closer photo so you can see the cute sentiment.  I DIG YOU.  corny and cute
I used the labels framelits and made it the size I needed.

I knew I wanted to keep it clean and simple, but I needed something else on the card, so I stamped the pot and flower from the Create a Pennant stamp set and embossed it with melon mambo and early espresso powder. (At the Addicted to Stamps and More challenge it was supposed to be chocolate chip and pink pirouette, but these colors are VERY CLOSE).


I used hemp for the embellishment and I think it works perfectly with this card - outdoors and all, don't you?


One last view for you.  Hope you enjoyed this clean and simple card.  Please stop by again to see more of my creations, won't you?

Entered at:

VC ROCKS

Techno Stamper Monday Lunch Challenge

ADDICTED TO STAMPS AND MORE


Monday, July 8

CARD BOX AND 3-D HELLO DOILY EMBELLISHMENT

 The most wonderful thing about the blogosphere is all the amazing people we get to meet that we might never have met without the blogs, websites, etc.  I have become a follower to a lady in France who is also a Stampin' Up! Demonstrator and I love her artistic style.  Her name is Cecile Ortiz and her site is called Lezards de Cilou.  I found this idea of making the Hello Doily into a 3D embellishment.  She put hers on a card, but I decided to decorate my card box and give it as a gift.

 I inked up my HELLO DOILY stamp with pinks in both ink pads as well as markers.  Where I wanted a specific color in a specific spot, I used the markers and the thump method.  Stamp on whisper white card stock 3 times in 3 different ways of color .

The first layer is just cut out around the edge, the next layer is cut within the first stitching and the third layer is cut just in the middle part of the petals.  See my photo so you understand what I am talking about.

The third layer I not only cut the skinny petals out but also cut them apart and then used glue dots to adhere them onto the top layer, closer together.  By bending and curling, you create the 3D effect.

 I put it on my card box, which is made with one sheet of DSP and holds 4-6 cards plus envies.  I am going to put HELLO DOILY CARDS in the box for my gift.  I added seam binding thru the oval punched handle for a bit of prettiness.


I made four of these to give to my next HELLO DOILY class members.  I used vintage RASPBERRY LEMONADE DSP because it has so many different colors of pinks.  LOVE IT!!

Thanks to CECILE for the idea.  Way to go girl!!

Thanks for stopping by today to visit.  I hope you will stop to visit again soon.

For Try Stampin' on Tuesday, I stretched their sketch a bit to make the circle AND the flower the same part of my design.  Hope that is ok!

Entered these items at:

Try Stampin' on Tuesday

Latenight Stamper's Weekly Challenge