Showing posts with label Secret Garden. Show all posts

Thursday, March 27

ANOTHER PRETTY FLOWER CARD

HEY BLOGGIES,

Oh, the leaves are all popping out on our beautiful elms and oaks here in The Woodlands, TX.  It is so beautiful to see all these spring green colors.  Green has always been my favorite color, especially in the spring,.

I have another springtime flower card for those of you still cold, wet or snowy.  I cased it from a card swap I did at Leadership in Houston.  This was Katy McG's card idea - thanks Katy I loved it and just had to case it!!

   I loved the design of the card how the upper left corner and lower right corner compliment each other.  I also like the colors - simple but so pretty.

I like the pennant banner from Perfect Pennants with the petite petals flower punched out and applied on it, as well as the washi tape behind it. And of course the saying is something we can ALL use a reminder about, yes?

Hope you enjoyed this card.  Please stop back by soon.

Perfect Pennants stamp set
Petite Petalks stamp set
Banner framelits
washi tape
Secret Garden stamp set

Saturday, June 29

Coral, Cantaloupe and Brides

That's quite a title, isn't it?  It describes the colors I used on my card today:  CALYPSO CORAL, CRISP CANTALOUPE AND BLUSHING BRIDE.  I saw this card on my fellow demonstrator's site, Debbie Henderson and knew I just had to case it.  Thanks Debbie!!  I am using different colors than she did, but the idea is hers.

 I used my SECRET GARDEN FRAMELITS and my SIMPLY SCORED to create the front of this card.

 Then I put the three different color card stocks behind the die cut flowers and added it to a calypso coral layer and then onto the blushing bride card base.

Ruffled ribbon in calypso coral.  The "THOUGHTS OF YOU BRING SMILES" is in melon mambo and was cut out with the layered labels framelits.  I had cut the cantaloupe layer behind it.


One more look at my complete card.  Thanks for stopping by.  Stay creative.

Monday, June 3

CHALKBOARD TECHNIQUE

The new rage is the chalkboard technique.  What is that you ask?  It is images heat embossed with white embossing powder on a dark background.  It looks like chalk on a chalkboard.

Today I have a fun share for you with flowers and buterflies in the chalkboard technique.  I saw this idea from fellow demonstrator Selene K.  Thanks Selene for sharing!!

 I realize that chalkboards are either black or green, but I really wanted to use Midnight Muse as my chalkboard so that it was like the sky.  I used the small periwinkle-type flower from SECRET GARDEN stamp set and one of the small butterfly stamps from PAPILLION POTPOURRI stamp set.  First I inked up with versa mark and then put white embossing powder on the flowers and heat embossed.

On a separate scrap of same color I stamped the small butterflies with versa mark and heat embossed and then punched them out with the PETITE BUTTERFLY PUNCH.  The flight lines are made with a white gel pen.  The butterflies are only adhered along their bodies so their wings are 3D.

The sentiment is from a vintage set called NATURES PACE.  I used a punch for both the sentiment and the white shadow behind it.

Hope you enjoyed this simple card in the chalkboard technique.  Won't you leave some "lovin" for me in the form of your comments?

Stay creative my friends!!

Thursday, May 30

SECRET GARDEN AND PRINT POETRY DSP

TODAY is the last day you can order from the Spring Catalog.  TOMORROW starting at NOON you can order from BOTH ANNUAL CATALOGS:  LAST YEARS AND THIS YEARS NEW CATALOG.  AND you can order from both until June 3rd.  What are you waiting for?  Get your wish list ready and set your alarm for one minute after NOON.  

My card today was inspired by my SU Manager, Dawn Griffith.  Thanks girly!!


Midnight muse is such a beautiful dark blue and is perfect on this card with the designer paper banner.


As I am sure you know, the Secret Garden stamp set also has a set of framelits that go with it to die cut the images with your BIG SHOT.  This is the first time I have made a large banner for my cards, and I must say I like it!!  Especially on this simple card.


I cut the banner tails with my paper snips and the solid flower is on stampin dimensionals.  Pearls are in the middle of each flower.

Thanks for visiting.
I am entering this card here:

PaperCraft Star


Thursday, April 4

I LOVE TEXAS, IN THE SPRINGTIME...

SPRING, GLORIOUS SPRING.  I hope you don't get sick of reading about how much I love spring.  If you are in the cold areas, I can only say it will come to you soon!!  We are basking in the wonderfulness of the warm breezes, low humidity, flowers, butterflies, etc.

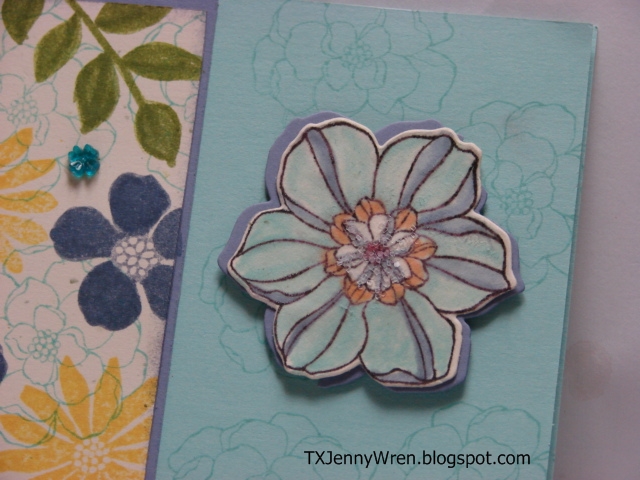
 I love Pool Party and am so excited to learn today that Pool Party is going into the permanent color families to stay!!  This card is standard sized, with Secret Garden stamp set and framelits.  I used wisteria wonder as the layer under my stamped created designer paper.

I used pool party ink and stamped some subtle images on the base card.  Then I stamped the flower in early espresso and heat embossed with clear embossing powder.  I sprayed water on the flower and used my markers to "water color" the petals.  I attached several of the framelits in wisteria wonder behind the flower for a shadow effect.

One cute little surprise is the teal plastic flower on the left.  Just a little HELLO ARE YOU LOOKING kind of thing.  That is the only thing that is not by SU.

Hope you enjoyed my card.  Won't you leave me a comment?

Stay creative my friends.  :-)

Linking up to the following challenges:

LNS

Paper Players Weekly Challenge

Live a Colorful Life

Stampin' Celebration Inspiration

Freshly Made Sketches

Make My Monday


Saturday, March 23

ANOTHER SECRET GARDEN CARD

As promised yesterday, here is another card to go inside the gift box card set.  This Secret Garden Stamp Set is so versatile and fun to use.

 Isn't this card darling?  I am loving this creation I came up with.  The card base is pool party and I used my color assistant to see that daffodil delight and island indigo are good color choices to go with it.  I used versamark and stamped the 5 petal flower from the set all over the card base. Then on a piece of whisper white I stamped 3 yellow flowers, 3 lucky limeade leave pieces, and three lilies in island indigo.  This lily stamp is an outline stamp and I LOVE IT.  I then stamped and die cut one more lily and attached with dimensionals where I had stamped it on the piece so that it goes over the art piece.  A real POW I think. And SO EASY with the FRAMELITS that match this stamp set.  You MUST get this BUNDLE for 15% off!!

 I stamped 3 yellow flowers and one island indigo lily on the envelop for FUN and to tease them about what is inside.

 Here is another look at the gift box I made for the cards to go inside.  What a fun gift someone will get!!


The little closure is the decorative label punch attached with flower brads.  The point of the box top slides behind the closure.

Thanks for stopping by.  Stay inky my friends!!

Linking up to the following challenges:

Sketch Frenzy Friday

Try Stamping on Tuesday

Techno Stamper

Stamping Celebration

Create with Connie and Mary

Thursday, March 21

SECRET GARDEN CARD GIFT SET

OOOOOOOH, I am so excited to show you my card gift set made with the SECRET GARDEN stamp and framelits.  You can purchase this as a BUNDLE to save 15% off the cost of the two items.

Secret Garden Bundle ClearStamp set shown on top
Framelits shown here on bottom

Secret Garden Bundle Clear  #131099
Price: $36.95
Coordinating Secret Garden Stamp Set + Secret Garden Framelits = two products at a 15% savings!


Now on to my creations:

 First is this wonderful gift box to hold cards and envelopes.  I saw this box on my fellow demo, Tanya Bell's blog.  It is made from one 12 x 12 sheet of the cardboard that backs a package of designer paper (free cardboard to recycle).

 I used the diagonal score plate to score a few lines, then snipped out only 3 pieces and VOILA - ready to make the box.

I came up with this idea to cover it - use a 12 x 12 piece of designer paper of your choice, and with Tombow glue, adhere it to the cardboard piece BEFORE you adhere your box together.  Easy Peasy!!

A decorative label punch is used for the closure.  Your point of the lid slips behind the punch.  Cute, huh?

My first card:

 Wisteria Wonder is the card base with only a portion run through the Vines textured impressions embossing folder.  I used HALF of a doily (only $2.95 for 25 doilies in the spring catalog!!) behind my flowers that are stamped and die cut with my BIG SHOT and the Secret Garden Framelits.  Calypso Coral ink for the flowers, each one stamped right after the other to make 3 different shades of the coral color.

  Also die cut the leaves from Lucky Limeade CS.  I used Stampin' Dimensionals to pop up the flowers.  I used some retired mini beads for the centers of the flowers.

I used the other half of the doily as a stencil on the envelope and sponged Wisteria Wonder ink around it, and then removed the doily.  This is where you would write the mailing address of this beautiful card.  Isn't it fun??!!

Tomorrow I will show you another card that is in this gift set.

I would love to hear your comments/suggestions.  Won't you leave me some love?

Stay inky my friends!!  And if you need to order any supplies, please consider ordering from my site by clicking my signature line below.  Thank you.