Tuesday, June 25

A SQUARE CARD WITH A FABRIC FLOWER

I don't usually make a square card for two reasons - one, it costs extra postage because the post office doesn't like square cards.  And two, I am more of a rectangle-shape card lover.  I don't do many round cards either for that matter.

Here is a simple but striking square card for you:
 This fun black, white and vanilla card is made with the First Edition Newsprint DSP backed with black card stock.  The fabric flower is made with faux leather and some kind of upholstery fabric, with an antique brad in the center.  I LOVE to use my big shot for decorations like these flowers!!

 This is the retired single THANK YOU stamp that I just love with the elegant swirlies around it.  I backed it with black card stock also.


Just a close up of the flower for you.  The marks on the fabric is stitching.  My Fun Flowers die cut through this thick fabric "just like a knife thru butta"  (That is my New England accent coming thru)

Hope you enjoyed this clean and simple card.  Thanks for stopping by.

I have entered this card at:

Addicted to Stamps and More

Just Add Ink

Sketch Frenzy Friday


I THINK YOU ARE AMAZING....

The LOVELY ROMANCE set coordinates with the Chalk Talk Framelits.  There are actually 3 or 4 sets that coordinate with these Framelits in the new annual catalog and I GOT THEM ALL.  (grin)

 Crushed Curry and Soft Suede on Whisper white are the colors of this card.  I used the Chevron Embossing Folder and rolled ink on it before running it thru the Big Shot. .Texture and color - gotta love it!

 The sentiment is soft suede with a soft suede layer behind it.  LOVING these FRAMELITS and STAMP SETS that COORDINATE, aren't you??!!

I put some yellow pompom trim along the left side of the chevron layer, and sponged crushed curry ink all around the entire card base. See the bling of a large pearl on the sentiment.  Just a little something special.


Did you notice the pretty DSP down the left side of the card?  AND the cute butterfly double layered on the right side?  FUN FUN FUN

I am entering this card at:

Techno Stamper Monday Lunch Sketch

Mojo Monday

Retro Sketches

PCCCS #48: Card Sketch

Monday, June 24

BABY CARDINALS IN THE NEST


HELLO from Texas JennyWren's nest - today I have a DIFFERENT nest to tell you about - a cardinal nest right at our front door.

Pretty Boy and New Wife (my names for the cardinal couple) have built a nest inside my jasmine vine that is climbing up the front of my house.  It is right at my front door.

I have tried several times to take a photo by holding my camera up and shooting, but have been unsuccessful until today.

Here are the GLIMPSES of the baby.  It seems like there is only one baby, but there might be two.  Feathers are already starting to show.  From the date I saw Pretty Boy starting to bring food to the nest, I think the baby is 9 days old.

 Sorry the photos are so horrible, but with the vines, the height of the nest and me trying to snap the photo quickly so the parents don't know I was there....this is the best it gets.
 The baby opened it's mouth thinking that momma or daddy was bringing goodies.

But he wasn't fooled by me this time.  Look at that "stink eye" he is giving me.  "Wha' chu lookin at?" seems to be his thought.

Nature is so wonderful.  I am glad that Pretty Boy and New Wife chose to build their nest next to our home "nest".

Until next time, stay creative!!

Saturday, June 22

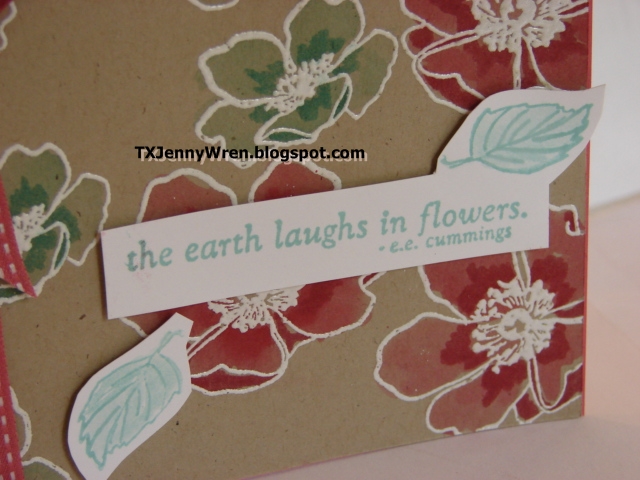
THE EARTH LAUGHS IN FLOWERS

I love that quote from E. E. Cummings that is included in the FABULOUS FLORETS stamp set.

I used Coastal Cabana ink for this  quote as well as for the two leaves I added.  The flowers are Coastal Cabana and Strawberry Slush.  The slush looks a bit darker than normal because it is stamped on this Confetti Cream vintage card stock.


Here is the full card.  I water colored these flowers with my aqua painter and the ink pads.  I shaded with the markers.  The ribbon is Primrose Petals, which is a very close color to Strawberry Slush and I think works well on this card.


 Another closeup so you can see the shading I used in my water coloring.

Thanks so much for visiting my blog.

I have entered this card at:

Addicted to Stamps

Freshly Made Sketches

Just add Ink

Make My Monday


Friday, June 21

HELLO DOILY SYMPATHY CARD

Do you have the HELLO DOILY stamp yet?  It is a beautiful background stamp of a crocheted doily, just like grandma made for us!!  LOVE IT.  My next stamp class will be cards made with this stamp.  Here is one we are making:

 Isn't this card so elegant yet simple?  The perfect card to let someone know you care and know of their sorrow.

 I used crumb cake card stock and then stamped the doily in Versamark and used CLEAR embossing powder with the heat gun.  Can't really see the stamped image until you sponge on Crumb Cake ink all over and around the doily.  Follow that with sponging Early Espresso ink just in the middle part to darken it up a bit.

 I used the Natural Ribbon with just a knot tied and the tag punch for my sentiment, tied with bakers twine around the knot.


Here's another look at the completed card.  IF you have any questions, let me know.

Thanks for visiting my blog.

This card is entered at:

CAS-ual Fridays

Try Stampin Tuesdays

Thursday, June 20

CREATING YOUR OWN OPEN-ENDED STRING-CLOSURE ENVIES

For special occasions, I LOVE my envelope to match my card.  It shows special care and love to the recipient.  I was delighted when I saw instructions on Jackie Topa's blog to make these cute open ended envies with string closures.  They are in the new Annual Catalog on several pages and now we can ALL know how to make them.  Thanks, Jackie.

 This one I am going to show you is for a regular 5 1/2 x 4 1/2" sized card.  Let's get started.

 Cut a piece of designer paper at 10 1/4 x 6 3/4".  Score 1" up from the bottom and 1" down from the top.  The widest measurement is going across the WIDTH.  Put your card on top of the envie and score 1/8" wider than the card on both sides. Now cut off the tabs where the scorelines intersect on each side.

 Use your hole punch or Crop-a-Dile to punch holes for the top and bottom brad closures.  The bottom brad must be punched BEFORE you adhere the two sides together or else it might be too close to the top flap when closed.   Add little punched out circles of card stock or paper with a brad.  Tie a piece of string around the top brad.  Then adhere the two sides together.

 Round the corners of the top and bottom flaps and adhere the bottom flap.


When you are ready to insert your card and close up your envelope, just wrap your string around the bottom brad a few times and you are finished!!

If you have any questions, please let me know.  ALSO, if you would like directions on how to make these for OTHER SIZED cards, leave me a comment and I will post those directions as well.

Thanks for stopping by.