Showing posts with label embossing. Show all posts

Tuesday, February 26

BUTTERFLIES ARE FREE TO FLY, FLY AWAY

Words from an Elton John Song I just heard coming home from Physical Therapy yesterday.  Which fits in perfectly with my card today, which is using the LARGE SWALLOWTAIL single background stamp.  I am LOVING this stamp!!

I started with a card stock base of very vanilla and stamped the Swallowtail with Versamark.

I applied white embossing powder and heat embossed it.  Here is a closeup so you can see the texture.

 I then used a sponge and soft suede ink and rubbed all over, darker on one side than the other for some shading and variation.  Next I rubbed more mustard ink where I desired.


With a clean cloth, I rubbed the white butterfly all over to get any stray ink that was on the embossed areas.  That's it!!  Now you can add a banner with your sentiment that you choose.  I do that once I know why I am sending the card, i.e. birthday, congrats, thinking of you, etc.

I saw this technique on Dawn Ochefski's blog, a fellow demonstrator.  Thanks Dawn!!

If you use this technique on your blog, won't you tell them you saw it here?  Thanks!

I would love to hear your thoughts on this beautiful and simple card.

Thanks for stopping by!!

Monday, February 18

BUTTERFLY WITH HEAT EMBOSSING AND CHALKS

Here is another SWALLOWTAIL stamped card.  It is stamped in versamark and then embossed with MELON MAMBO EMBOSSING POWDER and heat embossed.  I then colored it here and there with CHALKS until I had the colors and intensity I wanted.

Enjoy!!

Pink pirouette and melon mambo with assorted colors of chalk.

Thanks for looking.  Let me know if you have any questions.

Friday, December 16

PPA TAGS CHALLENGE - GIFT TAGS

PPA CHALLENGE - MAKE A GIFT TAG.  HERE IS MY ENTRY:


WOW!!  ONLY 8 DAYS UNTIL CHRISTMAS - ARE YOU READY??  I JUST DO THE BEST WE CAN AND LET GO OF THE REST.  I AM INTO SIMPLIFYING MY LIFE AND REMOVING STRESS.  SO I AM FINE WITH WHERE I AM IN THE HOLIDAY PREPARATIONS AND TRYING TO ENJOY THE SEASON.

THIS WEEK I HAD A GIFT TAG CLASS AND WE DID SOME FUN TAGS.  I WOULD LIKE TO SHARE THEM WITH YOU.
 This first tag above was so fun to make.  First we die cut some snowflakes with the BIG SHOT.  We placed it on the left side of the tag and sponged gold ink around it, then removed the snowflake.  Next we stamped some snowflakes on the tag with versamark ink and then heat embossed with a mixture of wild wasabi embossing powder and iridescent ice powder.  It was starting to look pretty good, but we were not finished yet.  Next we punched the round tag punch out of wild wasabi card stock and glued it on the top of the tag.  We punched a hole for the ribbon or string with our crop-a-dile.  We sponged some wild wasabi ink around the edge of the tag.

 To finish off this tag, we ran the northern frost strip die through our BIG SHOT with the silver glimmer paper to cut out some small snowflakes.  We glued one on the bottom left of the tag, but there is a hole in the middle of the die cut.  NO PROBLEM - we filled it with some galaxy fine glitter in a green color and VOILA - all finished.  All we added was early espresso 1/8" ribbon for the tie and we were DONE!!

 I got the idea for these cute tags above from Heather Summer's blog.  Hi Heather!!  I used the two tags DIE and my BIG SHOT with more mustard card stock.  Next we sponged around the edge of the tag with espresso ink.  We stamped the tall snowman on shimmer white card stock in basic black and fussy cut them out.  We also stamped the snowman onto the tag as well.  When cutting out the snowman from the white, you don't need his arms, but do use the very small circle punch for the two birds.  We colored parts of the snowman with the many marvelous markers.  We used crystal effects on his buttons, and used stamping dimensionals to pop up the snowman on the prestamped image on the tag.  We then added the punched birds.  We sewed on the ribbon through the tag with linen thread through the Christmas buttons.  LOVE IT.

Here is the chubby brother of the snowman above, from the same stamp set.  He is stamped on shimmer white card stock and surrounded with red glimmer paper die cut with the BIG SHOT and scallop oval frame die.  We used the galaxy fine glitter stacks for the scarf and some crystal effects for the buttons and the snowball in his hand.  One has bells sewn on his other hand like he is ringing the Christmas bells.  Again added ribbon and some with some linen thread also.  SO PRETTY WITH ALL THE BLING.

I REALLY LOVE THESE TAGS ABOVE.  I cut out the designer paper into the shape of a tag.  This piece of paper has glimmer dots already on it!!  Awesome.  I used the NOEL stamp and the designer tag punch to punch it out as well as the shadow behind it in wild wasabi.   Also sponged wild wasabi around the edge of the tag.  Used the punch on the top two corners to shape the strip of paper into more of a shape of a tag.  Used the Stars 2 die and my BIG SHOT with white cardstock.  We used the larged of these 3 stars and stamped the snowman offset on the star and embossed it with gold embossing powder.  Rubbed the edges of the star into versamark and gold embossing powder and heat embossed it again.

 Lastly, we punched out with the round tag punch for the top, used some metal hardware pieces and our crop-a-dile to punch the hole, then added either a button or a brad to hold it all together.  We used gold stretch cord for the string to hold it on the package.  We used the NEW cherry cobbler bling along his scarf, which  in the upcoming Ocassions Mini starting JAN 4th for ONLY $2.50.  LOVE THIS TAG.  WHAT DO YOU THINK ABOUT IT??


Final piece we made is this fun tag/convertible ornament.  On the white part when the tag is closed, you can stamp TO and the person's initial or name.  On the other side we decided we should put "this opens up to be an ornament for your tree" in case the recipient didn't know what it was.  When you open it up and push the button back down, you have a fun star ornament (Christmas designer paper).  Isn't it cute??!!  How great is a gift tag AND an ornament all in one??!!  At Hallmark last year they were selling similar tag/ornaments for $8.99!!

Merry Christmas to y'all.  May you find peace, hope and love this Christmas Season!!  Won't you please leave me a little comment to help me feel the love??!!

Thursday, November 10

CHRISTMAS CARD CLASS LAST NIGHT

HEY Y'ALL, We had the best time last night at my Christmas Card class.  We were a smaller class than normal, but that just made it more personal and more fun.  We made some awesome cards that I would like to share with you.  IF you decide to use my ideas, PLEASE be kind and give me credit for them.  It is how we roll, right?

The first card below is what I call a funky fold card.  The base of my card is cherry cobbler card stock.
The two outside edges went through the big shot with the petals a plenty embossing folder, then I added dots of Dazzling Details for accents.  I stamped the Stocking stamp with old olive ink on white card stock, then punched it out with the Stocking Builder punch.  I punched out the top, heel and top of the stocking out of silver glimmer paper.  It adds a special bling.  I used designer paper behind the stocking.  I stamped with cherry cobbler ink the sentiment on pear pizzazz card stock and fussy cut the top.  I think this is the LAGNIAPPE or special finish to make the card special, don't you?  I love how it sits up on the designer paper - it is just the perfect touch.

Thanks to Create with Dee for the idea of just embossing the two outside edges with the embossing folder.  Hi Dee Slater!!

I would love to hear your comments on this card.

Card Two:  This card is from an idea from the web = I can't remember whose site it was, but I love the idea.  I used the northern flurry embossing folder that was brayered with ink first.  This is how I got the white snowflakes on the card.

Marina mist and bashful blue ink and card stock, decorative label punch for the sentiment, rhinestones in the middle of the die cut snowflakes, and then dazzling details here and there on the embossed snowflakes are what make this card.  I used the ruffled Island Indigo ribbon on the top.  You can't see the bling very well but it is quite elegant in person.

Card 3:
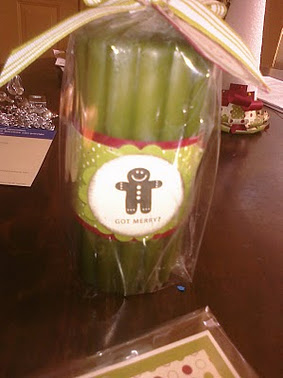
Got Treats stamp set is what I used for this card.  Love this little gingerbread boy.  Last year's designer series paper was used as well as old olive card stock.  Red fine glitter was used on his little buttons and it was all finished off with olive and white striped ribbon.  Last night we also added a layer of red glimmer paper behind the dsp and in front of the old olive card stock.  It really made it POP.

This candle matches the card for the perfect gift.
It is just a belly band around the candle that can be removed when it is lit.  Such a cutie patootie gingie.

Two more projects I will share with you tomorrow.  One is my absolute favorite!!

Still cleaning up and putting supplies away from last night's fun. Go get some inky fingers y'all!!

Saturday, August 27

BEAUTIFUL CARD WITH NO STAMPING!! (REALLY??? - YES REALLY)

MOJO MONDAY  CHALLENGE:  (http://www.mojomonday.blogspot.com/

I KNOW, IT SEEMS AMAZING, BUT I ACTUALLY MADE A CARD THAT IS BE)AUTIFUL AND INCLUDED NO STAMPING.  Now I did NOT say no INK or no Designer Paper, and I did NOT say no punches or ribbon.  ha

Here it is - what do you think?  It is the beee-u-ti-ful NEW DESIGNER PAPER called SPICE CAKE.  The colors in this pretty paper are pool party, soft suede, more mustard, pear pizzazz, and river rock.  I chose a few of those colors to highlight this amazing paper.  First I used pool party as my card base.  Then I layered more mustard under soft suede.  I used my fancy flower punch and punched out the patterned flowers from the paper, used snail to put it on the soft suede layer and then ran it through the big shot with the petals a plenty embossing folder.  This makes it look like a piece of an old quilt from grandma, doesn't it?

Now, I hear some of you murmuring to me saying, "hey, I recognize that patterned flower.  I think you stamped it with the NEW TRIPLE TREAT FLOWER SINGLE STAMP."  To you I say, NO I DID NOT, BUT IT DOES PERFECTLY MATCH THAT SINGLE STAMP.  How cool is that?  You could use the DSP and the stamp together on one card, not to mention the fancy flower punch with it!!

Don't you just LOVE how everything coordinates here at Stamin' Up!  I sure do!!  I LOVE this company.  Ok, back to my card, I digress...


For the middle I flipped the DSP over and it is a more mustard pattern which I punched out with the fancy flower punch BEFORE I did the embossing in the bigshot.  That ended up being the bottom layer of my 3-D flower in the middle.  I added two layers of punched pool party card stock, which I bent the petals a bit to go under, and I rubbed the middle to make it cup a bit.  Oh, and I also used a sponge and pool party ink to edge the flower.  Then I fussy cut (with scissors) the flower pattern and rubbed the center to make it cup also.  Then I used Stampin' Dimensionals in the middle to layer the flower all together to make it 3-D and more mustard card stock cut in slices thinly is the stamen.  You like??

I LOVE the new Pool Party ruffled ribbon.  I added a knotted tie at the bottom of the card and VOILA - a pretty NON STAMPED card made all with SU supplies.

Please consider leaving me a comment - I enjoy hearing your thoughts or questons.  Happy Saturday to you all.

p.s. Did  tell you that today it is 109 degrees here in my part of Texas??!!  They say the hurricane on the east coast is causing it to be hotter than normal.  I believe we set a record for this high of heat.  I am inside stamping and my hubby - he is outside working on the lawn!!  Stubborn man would not wait until this evening when it got down below 100 degrees.  I have been taking him glasses of water every 30 minutes so I won't find him passed out in the grass.  Love him and am grateful for all his hard work.

Inky fingers y'all.

Sunday, January 30

TWO MASCULINE VALENTINES HSSCT53 CHALLENGE

With Valentine's usually being all fru-fru and lacey, etc, I thought it would be fun to do a masculine manly card.  I used the a-la-carte single stamp BE MY VALENTINE for this card.  I stamped it in black ink on whisper white card stock, layered it onto News Print DSP, then onto real red card stock.  I put all these layers on a black card stock base and added a sheet of whisper white inside for the sentiment and note.  I used the very thin 1/8" black ribbon with the white edging to tie a simple knot.  LOVE IT.  And for just a little bling, I used my versamark pen and dabbled a bit on the heart then added black sparkle embossing powder and heat embossed it.  What do you think?  All the ladies at my workshop yesterday loved it.

Another masculine card is this one I made this past week for HSSCT53 Challenge:


Sorry the photo is fuzzy.  I used my phone instead of my camera to shoot it.  This is the FILLED WITH LOVE stamp set using old olive and real red ink, layered on black card stock.  I put the LOVE all "kittywampus" on the layer of Newsprint DSP which is also layered on black then the base white card stock.  I made a very simple knot with the BLACK SATIN RIBBON. 

Hope these gave you some inspiration to make your own masculine valentine's cards.  Won't you share them with me?

Keep stamping and smiling!!