Showing posts with label DSP. Show all posts

Saturday, April 18

GET OUT YOUR NETS - THE BUTTERFLIES ARE FINALLY HERE !!

Butterfly Thinlits Are BACK IN STOCK!

Get out your butterfly nets! After a (very) long migration, the Butterflies Thinlits Dies have landed in our warehouse and are now available for purchase!
The Butterfly Basics Thinlits are NOW AVAILABLE! Click through for details on some extra special perks if you purchase before April 30th. @PMRetreat #Stampinup #butterfly

Remember, you can take advantage of two special offers through April 30:
  1. Get the Butterflies Thinlits at a 15 percent discount–just $21.20!
  2. Buy any of the Butterflies Thinlits Bundles at a 15 percent discount and choose one of three FREE Sale-A-Bration items (only available while supplies last)!
CATCH the butterfly of your choice and enjoy this springtime!!

Click below to shop at my store.

Thursday, December 25

HUGS CARD

HEY BLOGGIES,

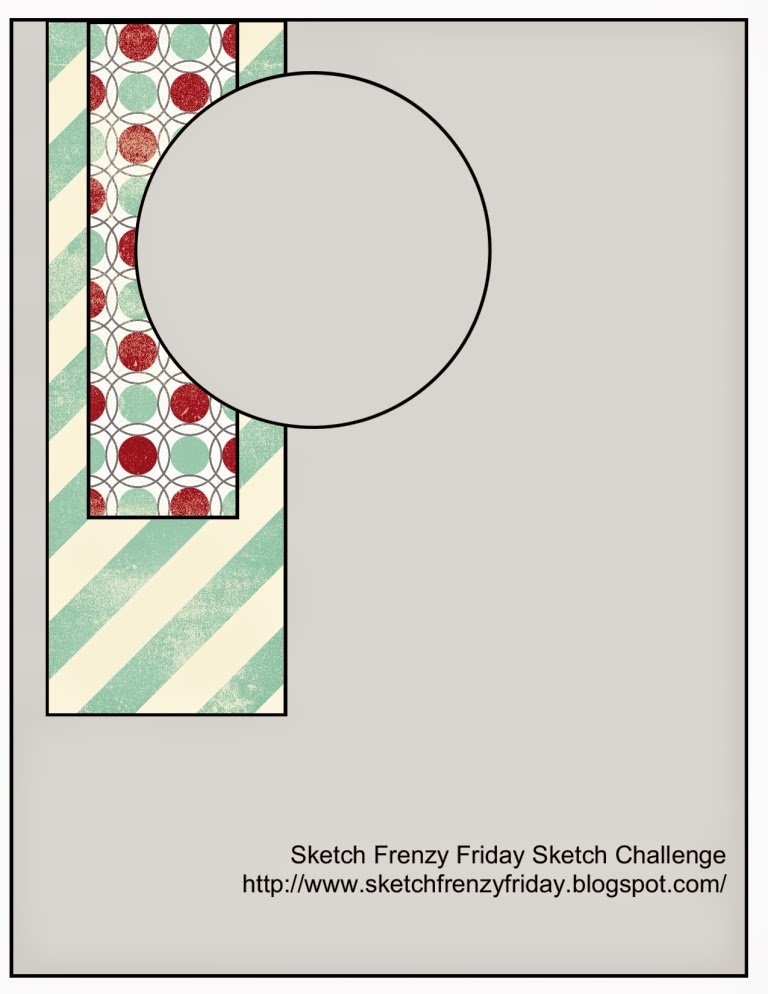
I have another SKETCH FRENZY FRIDAY card for you this week.  All the wrapping paper has been collected and put into the trash and the boxes are in the recycle pile.  Now get a cup of hot cocoa and take a look at my beautiful turquoise and black card for this week.  First, here is this week's sketch:


A very simple sketch that is easy and perfect to use for almost any card!!  Here is what I created with it:


I absolutely LOVE the combo of turquoise and black together.  I think it is a crisp and clean combo.  I used some circles and the pansy punch, then some banners and the sentiment is a HUGS die.


Here is a closeup of the main part of my card.  I used some stitching around the circles for added interest.  And I added a thin black boarder along one edge of the black and white dsp.  It is from the current SU catalog, but I am sorry I don't remember the name.  I think it is back to black, but I could be wrong.


I really love how my card came out.  I like the little pop of yellow in the center of the pansy.  And the surprise on how the turquoise circle behind the black only goes half way.  Just a little bit of interest to keep your eye busy.

Thanks for stopping by.  Time for YOU to now make a card and upload it to SKETCH FRENZY FRIDAY.  You have all week to come up with your creation.  We would LOVE to see what you create so please share with us.

I also entered this card at PAPER CRAFT CREW CHALLENGE.

Friday, October 17

SPOOKY HALLOWEEN CARD

HEY BLOGGIES,

I have a fun, spooky and EASY Halloween card for you today.  I LOVE when my designer paper does all the work for me!!
I used a piece of DSP from the black and white pack for my three panels.  I used old olive for my card base and a piece of black card stock for the layer behind the panels.  I scallop punched the layer before adhering the panels.  I added the spooky witch tree die cut in black card stock.  The I used two crow stickers from this month's Paper Pumpkin kit and added Crystal Effects to the two crows.

 Trying to get a photo to show the crystal effects on the two crows in the tree and the shine on BOOOO!  Can you see it?

 I stamped the cute BOOO! word in black ink on old olive card stock and layered it on black card stock.  I then flagged the end.


I used this sketch from SKETCH FRENZY FRIDAY to decide on the layout of my card:


My finishing touch was the black thread knotted on the left of the card.  This is also left over from this month's PAPER PUMPKIN KIT.

Thanks for visiting my blog today.  Stop on over to SKETCH FRENZY FRIDAY to see what my team mates have created for you with this sketch.  We would LOVE to see a card YOU make using this week's sketch!!


Monday, August 4

DOUBLE DUTCH FOLD CARD = FUN

HEY BLOGGIES,

My upline, Dawn G., showed us how to create this fun DOUBLE DUTCH FOLD CARD and I immediately made one and L.O.V.E it.  It is so fun!!  Thanks Dawn!!

 Isn't this DSP pretty with the strawberry slush and coastal cabana card stock?  I love it!!  So the top flap has the diamond adhered to it and it flips up before you open the two sides.

 Here the two sides are open but the top flap is closed down,

This card is entered at SKETCH FRENZY FRIDAY.  Go over to see what my design team members have created.  Hope you enjoyed my special THANKS card.  Stop back again for more creative ideas, won't you?

Monday, July 21

BUY 3 GET ONE FREE DESIGNER SERIES PAPER - ONE WEEK LEFT

HEY BLOGGIES,

Have you taken advantage of this awesome sale yet?


Demoheader_buy3dsp_demo_7-1-2014-7-31-2014_na
BUY 3 DESIGNER SERIES PAPER PACKS, GET 1 FREE:  Have you been waiting for a great deal on Stampin' Up! Designer Series Paper?  Well, wait no longer!  When you purchase three Designer Series Paper Packs during the month of July, you'll get one absolutely FREE. Don't miss out on this chance to stock up and save on our beautifully designed paper!   July 1 - July 31.  YOU HAVE ONE WEEK LEFT TO TAKE ADVANTAGE OF THIS SALE.. HURRY!!
There is no limit to the number of free Designer Series Paper packs you can receive. For each three purchased, you will receive one free.  Here are the choices for this promotion.  Stock up on one or get a variety.  All other Stampin' Up! designer series paper is excluded from this offer.
Item #
Description
Price
133698
Flowerpot Designer Series Paper
$10.95 US
133699
Flashback Designer Series Paper
$10.95 US
133693
Sweet Taffy Designer Series Paper
$10.95 US
133692
Confetti Celebration Designer Series Paper
$10.95 US
133694
Park Lane Designer Series Paper
$10.95 US
133696
Maritime Designer Series Paper
$10.95 US
133695
Lullaby Designer Series Paper
$10.95 US
133700

Back to Black Designer Series Paper

$10.95 US


I HAD AN ADDITIONAL BONUS DIRECTLY FROM ME DURING THIS SALE.  USE THE HOSTESS CODE GQV7HB3A  WHEN YOU ORDER AT LEAST $35 FROM ME UNTIL JULY 31ST AND I WILL SEND YOU A SPECIAL GIFT OF ONE OF MY RETIRED STAMPING SETS, YOUR CHOICE OF WHAT I HAVE.  

As soon as I am notified that your order has shipped, I will notify you with the list of what stamp sets are still available for you to choose one of the sets as my thank you for your order.

As always, I always send a personally created thank you card from me.

If you have any questions, please let me know.

Sunday, September 8

HALLOWEEN BANNER

I CREATED A HALLOWEEN BANNER THAT I THINK IS SO CUTE!!

 Here is my version of the SPOOKY banner.  Each letter is on a 5 x 7 flag and decorated.

 Some up close views of the letters and my decorations on the banner.  I used DSP as a half-medallion, washi tape, DSP mini banners and flags, and punches.

The letters are from my BIG SHOT and the ALPHABET DIES.  I sewed the ribbon onto the banner.

Thanks for stopping by my blog today.  I sincerely appreciate your support!!  It makes it more fun to make projects when I know others appreciate them.

Hope to see you tomorrow.

Tuesday, September 3

HALLOWEEN BLOG HOP --- DAY ONE

HELLO BLOGGIES,

Welcome to our GLITTER QUEEN HALLOWEEN BLOG HOP.  I am so happy that you have stopped by to see what I made for you today.  Are you loving the Holiday Catalog as much as I am??  There are so many ideas and wonderful new products inside to provide inspiration for our creativity.

Here are my projects for you today:


I have seen this idea on several blogs and know I HAD to make one.  It is from less than 1 sheet of DSP - Witches Brew.  I bought an inexpensive frame at the W store and used the top 1/3 of one sheet of the paper.  EASY PEASY


The bottom 1/4 of the same sheet of paper was used to decorate this cute little goodie box filled with chocolate yummies.  Black card stock is the base of the box with the designer paper decorating it.

Here is another photo of the display.


Thanks for stopping by today.  Come back tomorrow to see MORE PROJECTS for FALL. Click the pumpkins below to go the NEXT BLOG, which is TAMARA GADBERRY'S blog.


Here is our complete list of blogs for these three days:

Dawn Griffith (our Manager)
Jennifer Kay, or TXJennyWren (THAT'S ME)
Tamara Gadberry
Jan Mougel
Ronnel Stephanik
Dee Slater
De Williamson


Tuesday, May 7

THE OPEN SEA - CARD #3 - AHOY MATIES!!

Hope you are enjoying my cards this week from THE OPEN SEA stamp set.  I certainly am enjoying making them.  I don't make masculine cards very often because they just don't seem "fun".  But I have to admit this stamp set IS FUN to use and to make these cards!!

Today I have a card made with SOFT SUEDE AND RIVER ROCK for you:

 Ahoy Maties, isn't she a beauty?  I saw a similar card to this on the web but it did not have a name with it.

I used the edge tool to rough up and rip the edges of the card stock.  Then I used my bone folder to stress the corners until the layers separated.  I think it gives it the feel of old documents like perhaps a treasure map?  LOVE IT.

I put brads at the corners of the ship image, which I used my aqua painter and added a bit of water coloring on it.  I also put a brad in the center of the compass and painted the spindle a bit with my aqua painter and some ink.
The background behind the ship layer is made from stamped images on river rock.  LOVE that distressed look, don't you?

One last look at the complete card.  The first layer on top of the card base is some retired DSP, but you could easily make a layer yourself with the stamps included in this set.  The manifest stamp works really well as background.

Here is the index of all the stamps in the set, which is only $18.95 in the clear.
If I can help you with any supplies, please click my signature below which will take you to my Stampin' Up! store.

Stay Creative, My Friends!!

Sunday, April 14

FRENCHIE FOLD CARD

Good morning all.  What an amazing day here in Southeast Texas.  My monarch caterpillars are getting big and fat and will soon spin their crysallis.  My tomato plants have little maters all over it.  And flowers of all kinds are blooming and beautiful.

I saw a cute and fun fold card on my fellow demo FRENCHIE's blog (hi Frenchie).  She called it fancy fold, but I already have that name for a different folded card.  So I am calling this Frenchie Fold.  grin

 This card is cut the long ways from the card stock to get two long and tall cards.  Then with a few score lines and a punch out at the top, you have your fun card.

 I am still loving my cupcake punch.  I used the icing on dimensionals as the "latch" to keep the card closed.  You just slide it up from the cupcake and it can then open.

 This is actually attached on the inside fold, but it peeks out through the punched circle on the top fold.  I used two different sizes of scallop circle punches to create this adornment.


Here is the first layer opened so you can see how the scalloped circles are attached to the second layer, along with the DSP.  One more fold opens it up to see the sentiment inside.

Hope you enjoyed my fun folded card.  Won't you leave me a comment and tell me what is YOUR favorite shaped card you like to make or receive?

Stay creative, my friends!!

I am linking this to:


Saturday, March 2

RAIN BOOTS, UMBRELLA, SPRING FLOWERS AND DUCKIES..

WHAT DO ALL THESE THINGS HAVE IN COMMON?  RAIN BOOTS, UMBRELLA, SPRING FLOWERS AND DUCKIES??      S P R I N G   R A I N

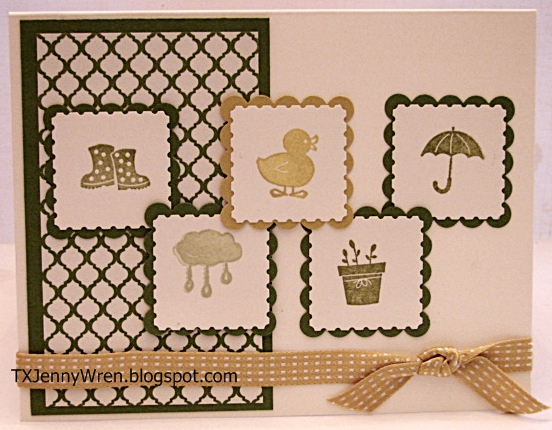
I used the stamp set called SPRING SAMPLER for my card today.  I chose 5 stamps that I think depict where we are here in Gulf Coast Texas.  It is still cold at nights and windy cold, but the days are beautiful blue one day and gray and rainy the next.  We definitely do NOT complain about the rain since we have been 2 years in a drought now.  We WANT these spring rains to come as often as they can!!

I used spring colors of gumball green, starfruit, certainly celery and old olive.  Isn't this a cute and simple card?

 I used the postage stamp punch to punch out the inked images, then I layered them on top of the scallop square punch in gumball green and starfruit.

 The ribbon is not showing up with the true color.  It is also summer starfruit like the duck.  And here the green is showing up too dark.  I am sorry about the lighting.


The designer paper is from the Print Poetry paper stack and it is gumball green.  The rain cloud and raindrops is NOT gray, but is certainly celery.

Hope you enjoyed my card.  I am linking it to the following challenges:

SU-ONLY CHALLENGE

March SCIC #65

PAPER CRAFT CREW CHALLENGE

CREATE WITH CONNIE AND MARY

LATE NIGHT STAMPERS CHALLENGE

TRY STAMPIN' ON TUESDAY

Thanks for stopping by my blog!!  Won't you leave me a comment on my card for today?

Sunday, February 24

CARD TECHNIQUE: TILES WITH GROUT

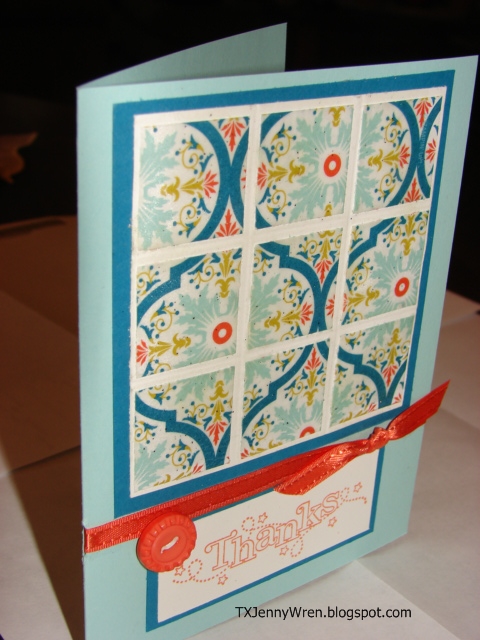
I have seen this in several places in bloggie land recently - TILES WITH GROUT TECHNIQUE.  I saw the video on Frenchie's blog and used her directions.  Thanks Frenchie!! (France Martin of Wyoming).

Equal sized cut pieces glued onto a back layer and then covered with versa mark and heated with clear embossing powder. It comes out shiney like real tiles.  (sorry it doesn't show the shine in the photo).


I used the FREE Sycamore Street designer paper from SALE-A-BRATION, which is still available until March 22nd.  Don't you L O V E free??!! I sure do.


Also FREE and used on my card is the Sycamore Ribbons and Buttons Pack.  It includes:  three rolls of ribbon (pool party, tangerine tango and island indigo) and a bunch of buttons in those same three colors!!]


linked up to The Paper Players
Copy and Paste our Badge for you blog!

Thanks for visiting my blog.  Won't you leave me a comment?  I so enjoy hearing from y'all.